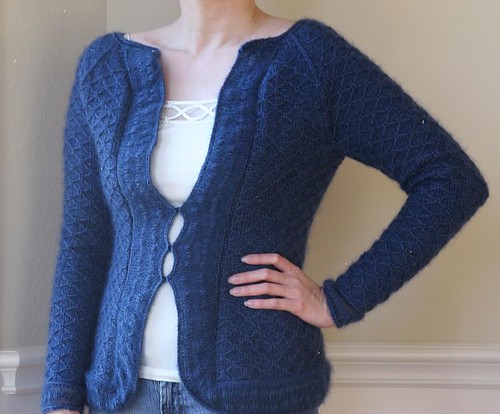
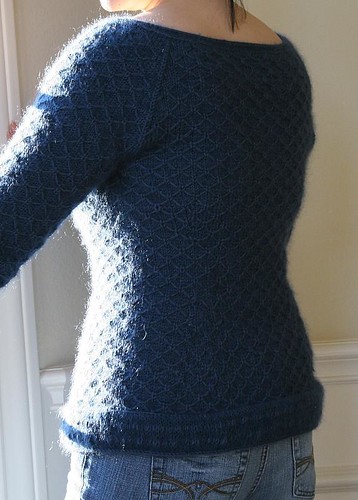
 Completed: January 2009
Pattern: Ivel, by Evi T'Bolt
Yarn: Blue Sky Alpacas Alpaca & Silk (50% alpaca, 50% silk), #134, 3 x 146yd/50g
Notes:
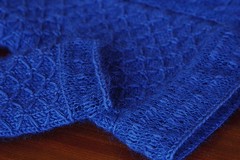
My camera had trouble capturing the deep blue color of the yarn. The closer pictures are the modeled shots.
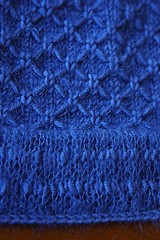
The design is gorgeous and the pattern pdf is visually beautiful; you can tell that it was lovingly created. I think the way the increases and decreases are created is really clever, and incorporating them as darts makes for some beautiful shaping.

There are some aspects of the pattern with meticulous attention to detail, such as the finishing directions for the knitted hem and directions for putting in hook-and-eye closures. However, there are some errors and many aspects of the pattern that are confusing. The designer, Evi, helped in sorting some of them out. My notes below are current as of my last communication on her on 12/29/08. It looks like an updated pattern is being released this week (2/4/09).
Sleeves
To begin the sleeves, you cast on with the smaller needles. Note that the specific example provided for calculating the sleeve length has an error.
If you are making the smallest size, check out the schematic for the sleeves very carefully. I have skinny arms, but my upper arms are not 9-3/4-inch skinny! Evi shared that her intent was to have negative ease in the sleeves. For me, though, I prefer to have neutral or positive ease for my arms. Rather than following the pattern’s directions for the sleeves, I began with 4 repeats of the even pattern and then made 12 sets of increases. To do this, you can just cycle through chart C again; after completing line 48, I went to line 1, incorporating an extra set of motif a on either side.
The pattern calls for the sleeves to be worked with a slipped selvedge stitch. However, I prefer not to do this when I will be seaming; the seam tends to gape a bit for me if I do.
On the sleeves, I incorporated the selvedge stitch into the pattern, which helps it to keep a consistent look when you get to row 7 of motifs a&b. If you don’t do a ktog with the running thread at the beginning and the end of row 7, you’ll have a running thread that doesn’t form an “X,” and that looked odd to me. Another solution would be to move the selvedge stitch out 1 st from where the pattern indicates, or to knit the sleeves in the round.
For the double increases in chart C, I did a variation of what Evi suggested: ptbl, yo, ptbl into same stitch.
There is an error on line 35 of chart C. Those p2tog’s should be k2tog’s.
Skirt/Body
For chart B, I did the purl stitch on row 5 as a slip stitch instead.
For the double decrease in chart D, I did a sl2, k1, p2sso.
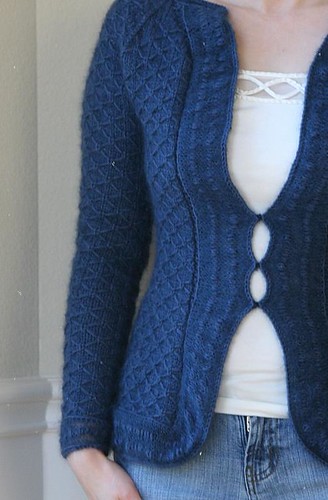
While I love the drama of a full-length coat, I can’t see myself having the heart to sit on it and potentially end up felting the butt :-) So I made it just a regular cardi length. In the main body, I did 1 pattern repeat even, 6 sets of decreases, 1 pattern repeat even, 3 sets of increases, and finally ended with 2 pattern repeats even, before starting the armhole shaping. In the pictures, it looks like there are 6 sets of increases after the waist, rather than the 3 sets that the pattern calls for. I went with the pattern because that worked out better for my measurements.
Joining
The pattern calls for raglan shaping that starts out more rapidly and then slows down. I was afraid the upper arm area would get too tight too quickly on me, so I just made it a standard raglan, decreasing every 4 rows. In retrospect, I could have probably followed the pattern.
Since I did extra increases in the sleeve, I had extra stitches to deal with. I knew that the suggested armhole depth, 6-1/2”, would be pretty shallow. So I decided that I’d just let myself have extra stitches in that sleeve section to make a wider neckline.
For the most part, this worked out, except that it was a bit too wide and kept slipping off my shoulders. I fixed this by going back and redoing the neckline edging, picking up stitches in a 2:3 ratio along the sleeve area and the outer parts of the back piece. This pulled everything in and I’m okay with how that turned out. Another option would have been to do decreases in the middle of the sleeve for the last 3 pattern repeats, following chart D. I think that would have added a nice shape at the top part of the sleeve, but I didn’t think of it at the time.

I found the suggested raglan decreases difficult to execute, so I did them as a sl2, k1, p2sso double decrease. On the RS rows in which I did not do a decrease, I slipped the “join” stitch.

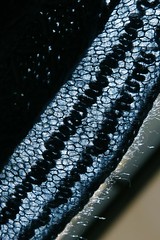
Edging
For the edging, I used the larger needle when knitting with Kidsilk Haze alone and the smaller needle when knitting with the wool alone, but the pattern didn’t specify whether you were supposed to switch out needle sizes or not.
The pattern implies that you would pick up stitches in a 1:1 ratio along the selvedge stitches at the front edges. This looks just fine, but then your stitches along the front are a lower density than when you do the bottom edge, so I picked up in a 3:2 ratio instead. When you get to the bottom corners of the edging, you can consider doing some mitering. I didn’t–it looks okay after blocking and gives a rounded edge, but i did have to be careful to bind off very loosely in that area so that it wouldn’t pucker.
I made the sleeve edging shorter than the edging along the body
When I finished 10 rows of the facing for the edging, I just knitted it together with the wool bind-off edge, binding off as I went, just like I would do a knitted in hem. I found this quicker and less fiddly than having to seam it.
I tried several times, but I couldn’t get the hook-and-eye closures to work out. So instead, I used snaps.
Yarn
I love the extra texture, warmth, and richness of holding the Kidsilk Haze together with the main yarn. Even though it’s mohair, it’s relatively soft, plus it’s not going to be directly next to my skin, so I think I can handle it. However, if you’re extra sensitive, if you just don’t like the look, or if you’re being budget-conscious, I do think it’s reasonable to knit the main part of the garment without the extra strand of Kidsilk Haze and then just use it or a comparable yarn just for the edging.
1 comment:
Thanks for posting this. I just cast on for this and wondered if I was going nuts at trying to digest the instructions.
Post a Comment