
Completed: September 2009
Pattern: Hobby Horse, by Ann Budd
Yarn:

Notes: I am no sock knitter, so I’m not sure if it’s a mistake or not, but I believe the first decrease on the gusset should be a k2tog, rather than a ssk. I guess it doesn’t matter all that much since it’s felted.
When making the face, I first knit 1 round before starting the basketweave stitch pattern. This avoided weird purl bumps of the MC showing through on the first round of the basketweave. The pattern calls for k2p2 as the stitch pattern, but the picture looks like it’s a k4p4, so that’s what I did instead. After finishing the face, I did a 1/2 round to move the remaining color transitions to the underside of the face to make them less obvious.
The only other minor thing I found was that the diagram of the bridle doesn’t really correspond to what’s pictured. No big deal, though. I will confess that I bought some decorative cord to use for the bridle rather than making I-cord, and I used just regular yarn to close off the bottom instead of making a crochet chain. Why? ‘Cause life is short and my queue is long! :-)
I used the Imperial Stock Ranch Lopi because I wanted a natural-colored yarn, and I already had it on hand. It did not felt nearly as well as the Cascade 220, though, and I wish I had gone ahead and bought more 220 instead.
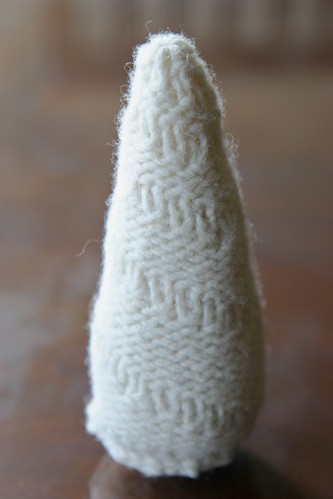
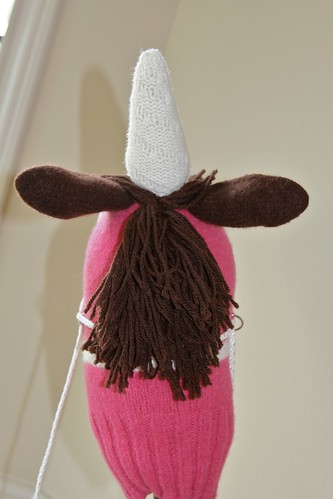
I did the stripes on the neck a little differently, but the main modification I made to this pattern was to add a horn. It’s attached with velcro rather than sewn on, just so my little one has the option of choosing what kind of steed she wants to ride that day. The “hair” for the forelock area was arranged in a V-shape (basically like an inverted widow’s peak), creating a comb-over that hides the velcro. The soft side of the velcro is sewn to the head and the hard side is sewn to the bottom of the horn, to avoid having the hair snag on the velcro when the horn is not in place. The pieces of yarn that make up the forelock at 8" long and the yarn for the rest of the mane is 10" long.


CO 24sts. Join to knit in the round
1: k10, p2, k10 , p2
2: k9, p2, k10 p2, k1
3: k8, p2, k10, p2, k2
4: k7, p2, k10, p2, k3
5: k6, p2, k10, p2, k4
6: k5, p2, k10, p2, k5
7: k3, p2tog, p1, k9, p2tog, p1, k6
8: k2, p2, k9, p2, k7
9: k1, p2, k9, p2, k8
10: p2, k9, p2, k9
11: p1, k9, p2, k9, p1
12: k8, p2tog, p1, k8, p2tog, p1
13: k7, p2, k8, p2, k1
14: k6, p2, k8, p2, k2
15: k5, p2, k8, p2, k3
16: k4, p2, k8, p2, k4
17: k2, p2tog, p1, k7, p2tog, p1, k5
18: k1, p2, k7, p2, k6
19: p2, k7, p2, k7
20: p1, k7, p2, k7, p1
21: k6, p2tog, p1, k6, p2tog, p1
22: k5, p2, k6, p2, k1
23: k4, p2, k6, p2, k2
24: k3, p2, k6, p2, k3
25: k1, p2tog, p1, k5, p2tog, p1, k4
26: p2, k5, p2, k5
27: p1, k5, p2, k5, p1
28: k4, p2tog, p1, k4, p2tog, p1
29: k3, p2, k4, p2, k1
30: k2, p2, k4, p2, k2
31: p2tog, p1, k3, p2tog, p1, k3
32: p1, k3, p2, k3, p1
33: k3, p2, k3, p2
34: k1, p2tog, p1, k2, p2tog, p1, k1
35: p2, k2, p2, k2
Break yarn and weave tail through remaining stitches.
Now, you have to decide whether you like the inside or the outside better. Personally, I liked the side with mostly purl stitches better, so I turned it inside out. If you want to only make a unicorn, you can sew this onto the head after each is felted, stuffing it before you finish up the seam. If you want a “convertible” horn, you’ll need to make a base for the horn.
CO 6sts. Join to knit in the round
1: knit
2: kfb each stitch (12 sts)
3: knit
4: knit
5: kfb each stitch (24sts)
6: knit
BO.

Felt all the pieces separately and then saw the base onto the horn, stuffing it before you finish up the seam. Sew the hard side of the velcro onto the base of the horn and the soft side onto the horse’s head.

No comments:
Post a Comment